


Learn how to set up GitHub Copilot in VS Code in just a few easy steps. Boost your productivity with this AI-powered coding assistant.
What is GitHub Copilot?
GitHub Copilot is an AI-powered coding assistant developed by GitHub and OpenAI. It helps you write code faster by directly suggesting lines, functions, or entire blocks of code in your IDE.
What are AI-Powered Code Suggestions
Instead of typing everything manually, Copilot analyzes your code context and provides smart suggestions. It uses machine learning models trained on public code to offer real-time support.
Benefits for Programmers
- Saves time by reducing repetitive tasks
- Increases productivity
- Supports multiple programming languages
- Ideal for learning, prototyping, and exploring new APIs
Supported Languages and IDEs
GitHub Copilot works best with VS Code but also supports JetBrains and Neovim. It supports popular languages like:
- JavaScript
- Python
- TypeScript
- Go
- Ruby
- Java
- C/C++
Step 1 – Install Visual Studio Code
Go to the official Visual Studio Code website and download the installer for your OS.
Windows:
- Use the system installer (.exe)
- Accept default settings
macOS:
- Drag the VS Code app to your Applications folder
Linux:
- Use Snap or download the .deb or .rpm file
Once installed, launch VS Code.
Step 2 – Sign in to GitHub
Inside VS Code:
- Open the Command Palette (Ctrl+Shift+P or Cmd+Shift+P)
- Search for Sign in to GitHub
- Authorize VS Code in your browser
Create a GitHub Account
If you don’t have one, head to GitHub.com and register for free.
Step 3 – Install the GitHub Copilot Extension
Now you’re ready to add Copilot to VS Code.
- Open the Extensions View (Ctrl+Shift+X)
- Search for GitHub Copilot
- Click Install
You should now see a GitHub Copilot icon in the sidebar or status bar.
Step 4 – Enable GitHub Copilot
After installation, activate the extension:
- Go to Settings > Extensions > GitHub Copilot
- Click Enable Globally
You might be prompted to authorize Copilot. Follow the prompts in your browser.
Step 5 – Customize Copilot Settings
Inline vs Popup Suggestions
- Inline: Suggestions appear directly as you type
- Popup: Hover or use shortcuts to reveal suggestions
How to Adjust Autocomplete Behavior
- Tab to accept suggestion
- Keyboard shortcuts for next/previous suggestion
- Auto-trigger toggle
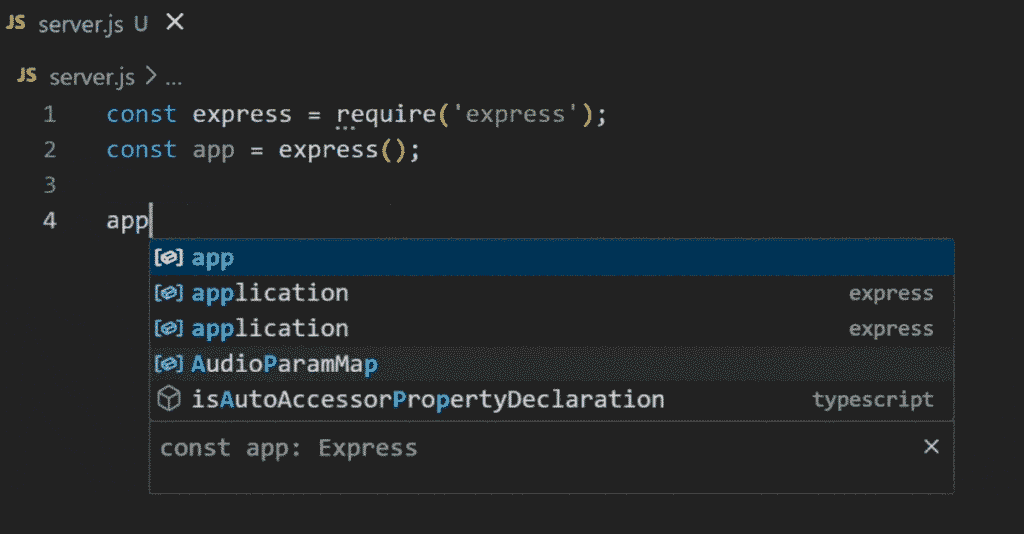
Step 6 – Start Coding with GitHub Copilot
Now it’s time to see Copilot in action!
Try typing code in:
- Python: Start with def or import
- JavaScript: Start with a function or a const
- HTML/CSS: Start with or body
Just start typing. Copilot automatically suggests the next line or block. Press Tab to accept the suggestions.
GitHub Copilot Features and Capabilities:
- Code Completion: Line-by-line or whole block suggestions
- Function Suggestions: Autocomplete functions from comments
- Documentation and comments
- Refactoring: Help Suggests cleaner or alternate solutions
Best Practices When Using Copilot
- Always review Copilot’s code
- Don’t blindly accept suggestions for sensitive logics
- Use version control to track changes
- Combine Copilot with manual coding for the best results
External Resources and Learning Paths
GitHub Copilot YouTube channel
If you Drupal Developer, learn how to upgrade from D10 to D11
Kamran Afzal is a passionate programming mentor dedicated to helping aspiring developers become proficient in Drupal. With extensive industry experience, Kamran is committed to sharing his knowledge and guiding learners from beginner to advanced levels. His YouTube channel, Programming Mentor, offers clear and engaging tutorials on a variety of topics. Skills: Drupal 9, 10, 11, PHP frameworks, AWS, React, Angular, Node.js, MySQL, Apache, Nginx, Apache Solr, Elasticsearch, Memcache, REST API, Git, Twig
0 Comments